Inbox

Labwork and hospital reports use the same inbox as scanned documents.
- The reports with an orange background are for results that have not been matched to a patient.
- Results bracketed with *’s indicate unopened results.
- Results flagged as abnormal are listed in red
- The panel on the left lets you filter the view by type and patient
Patient Matching (+/- add chart to OSCAR)
Reports with an orange background have not been automatically matched and need to be matched manually.
To Match Click on the lab in the inbox list view, eg Michael Jackson and both the lab (below) and a Patient Matching Window will open
The matching window allows you to search OSCAR for a matching demographic
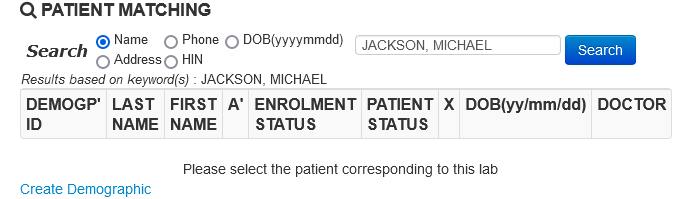
If you have Michael Jackson in your OSCAR listed as Mike Jackson try that search and match to that demographic.
TIP as names change or get misspelled the safest search is by HIN. Copy the HIN (PHN in BC) from the unmatched lab /report and paste it in place of the name and then select HIN and searching.
If the person is not in your OSCAR then click on the Create Demographic link and the ‘add demographic’ window will open already set with a minimal set of patient demographics as taken from the lab report
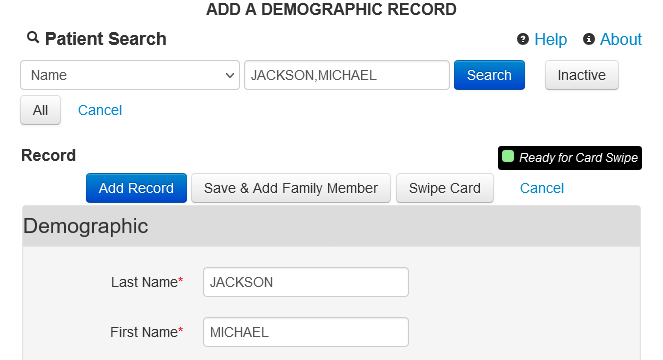
Add any additional information that you want or just click on Add Record.
Unless the HIN is already in use, a new demographic will be added and Patient Matching will update with the newly created demographic (note that the DOB and gender are from the lab but the doctor and enrolment status and other details are not automatically entered and would need to be added manually)
TIP Set your oscar.properties to have skip_postal_code_validation=true if you are going to be using this feature as the postal code is not provided in the transfer of demographic data from the lab
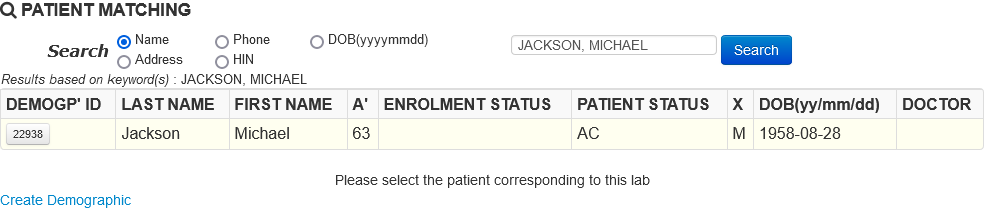
Click on the Demographic number button (here ‘22938’) and the lab will be matched to the patient and the orange background will be removed
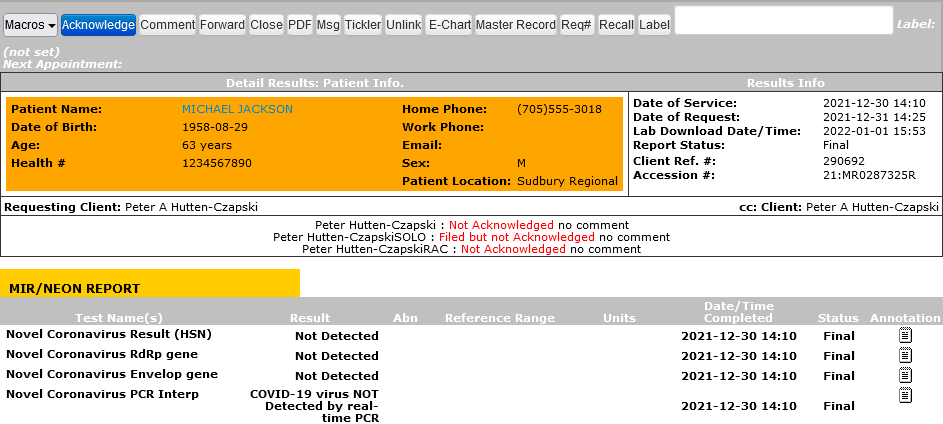
Reviewing Results
Clicking on a lab report will give you a screen with the result.
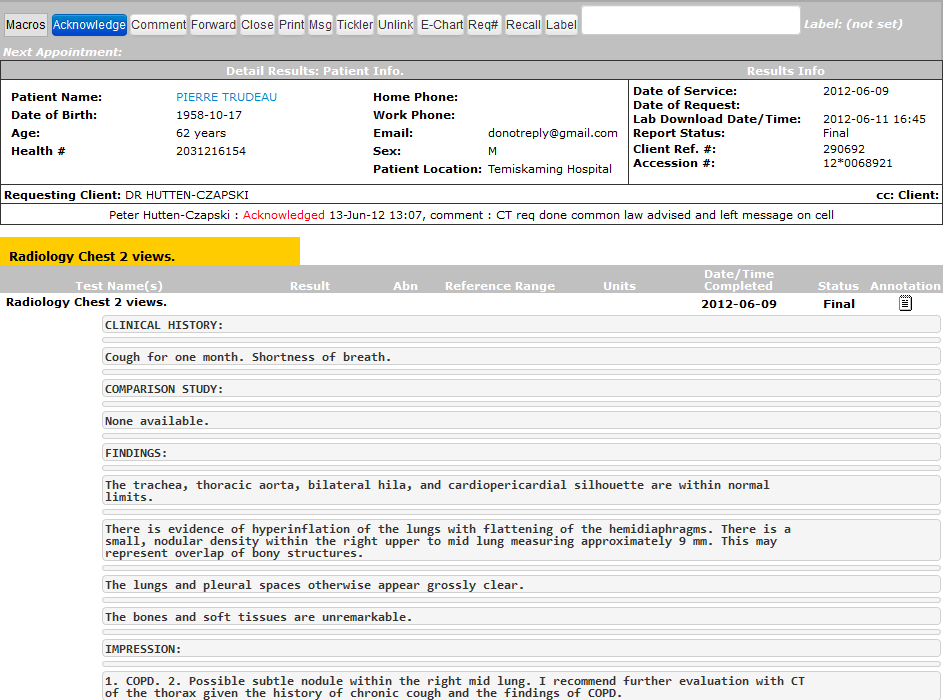
There are a number of options you can
- Use one of your pre-defined ‘Macros’ you set in preferences (hover to open then click)
- ‘Acknowledge’ the result (clicking the Macro dropdown itself will cause Acknowledgement)
- and provide a ‘Comment’ to add an annotation to each individual result
- ‘Forward’ the result to another user
- ‘PDF’ the Result for printing
- Send a Message (‘Msg’) relating to this demographic and result (inform pt)
- You could set a ‘Tickler’ reminder on this patient (repeat next week)
- If the result is misfiled you can ‘Unlink’ it
- You can also open the ‘E-Chart’ and link to a lab ‘Req’uisition number
- You can open the ‘Master Record’
- You can set a ‘Recall’ set that sets a tickler and sets a message for high priority result followup
- And, if you don’t like the label the lab gave to this series of labwork you can supply a more useful one here eg here you might want to supply “u/a” as the label instead of the cryptic POC/NEON
- The patients next appointment is listed or you can click on next appointment to see a list of all the patients appointments
- You can check the versions of each result by clicking the v1 v2 All links
Documents
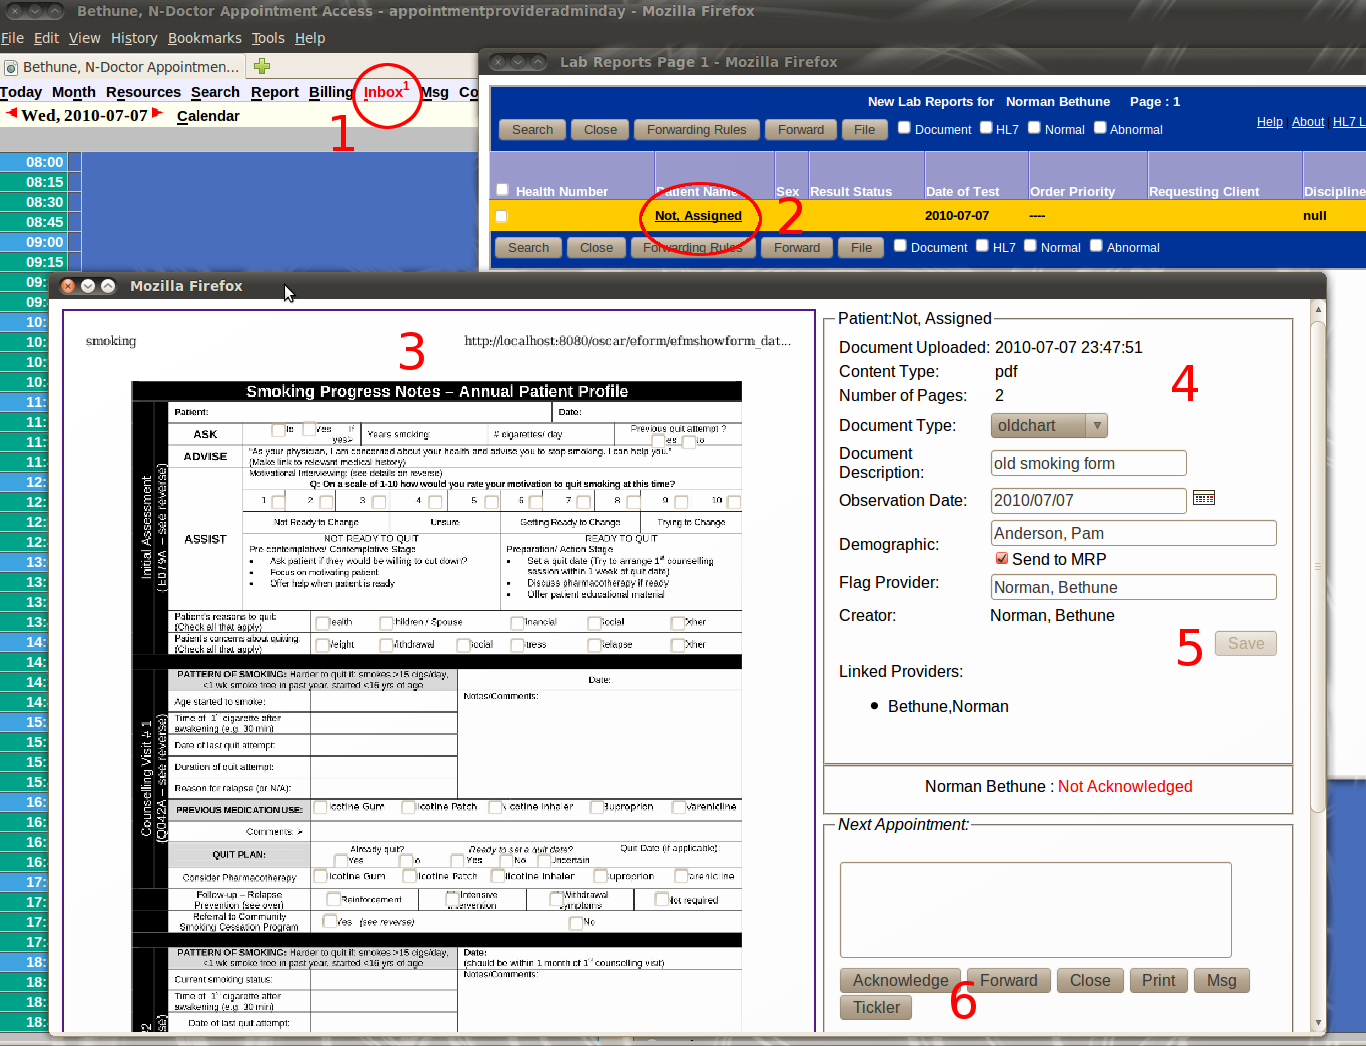
- When your inbox has new results for you it turns red with a superscript of the number of new results. Click on the inbox to view
- Here we have one new item in the inbox, its not been matched to a patient yet so it is highlighted in orange
- This is an image of the item, its a scanned pdf that you can acknowledge and comment
- Edit the information about the item here
- ‘Save’ (an option available after you match the demographic)
- ‘Acknowledge’ with space for comment or ‘Forward’, ‘Print’, send a Message (‘Msg’) relating to this demographic and result or add a ‘Tickler’ for this patient
Hospital Report Manager HRM
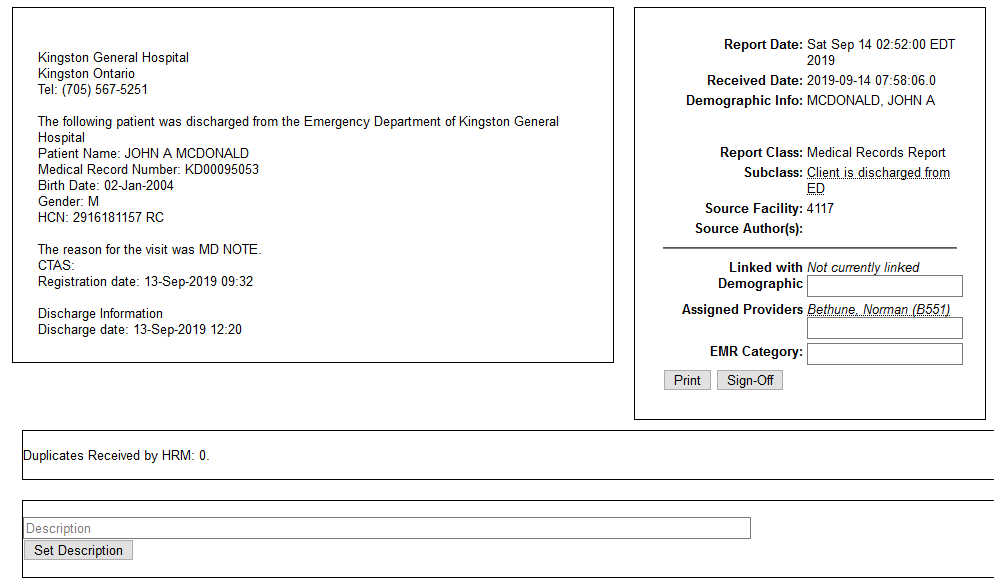
- You have an unmatched report here that is not currently linked
- Try matching the patient against OSCAR by typing in the name in the link bok
- You can ‘Print’ and ‘Sign Off’ the report
Preview

The ‘Preview’ button allows you to toggle from the summary list to a continuous scroll of results
- Click on the appropriate filter in the left pane to view the results of interest
- As you acknowledge the results they are taken off the list
- Just remember to link unmatched results to demographic first!
Forward
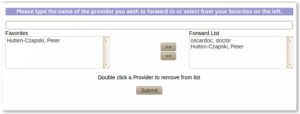
Type a few letters of the provider you want to forward the lab work to, or use the buttons to move a favorite provider into the list of those to receive a copy of the lab result in their inbox.
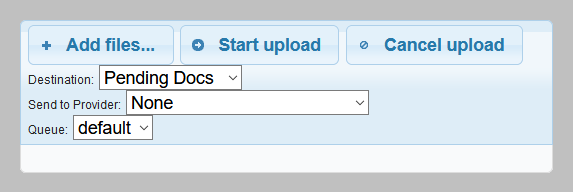
Doc Upload
The Document Upload link connects you to a file selection window that will upload your files to the inbox.
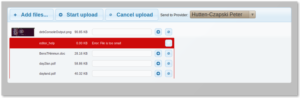
- You can select multiple files at once with the file selector opened by the ‘Add files…’ button
- Files scheduled for upload are displayed, with a thumbnail of graphic files.
- Simple file errors are highlighted
- Click ‘Start Upload’
- Progress bars will appear as the files upload to the inbox
For other file formats attach them via the other ways to add e-documents
We recommend that you upload everything to INCOMING DOCS, rather than the default PENDING.
Incoming Docs have 4 folder options Fax, Mail, File and Refile. Mail and File are the most important.
Within Incoming Docs there are 4 folders: Fax, Mail, File and Refile. Mail and File are the most important.
- MAIL is for physicians to review and act upon. This folder when opened, will automatically tag the MRP after a patient is selected and linked to the document. The labeling MOA may UNLINK the MRP by clicking a button, but this is strongly discouraged.
- FILE is simply for filing in the appropriate chart. Things like paperwork that originated in our office (completed referrals, pt questionnaires, etc.) This folder will not tag the MRP, but MOA may choose to tag any OSCAR user, if needed. Perfect when scanning all your paper charts.
Incoming Docs
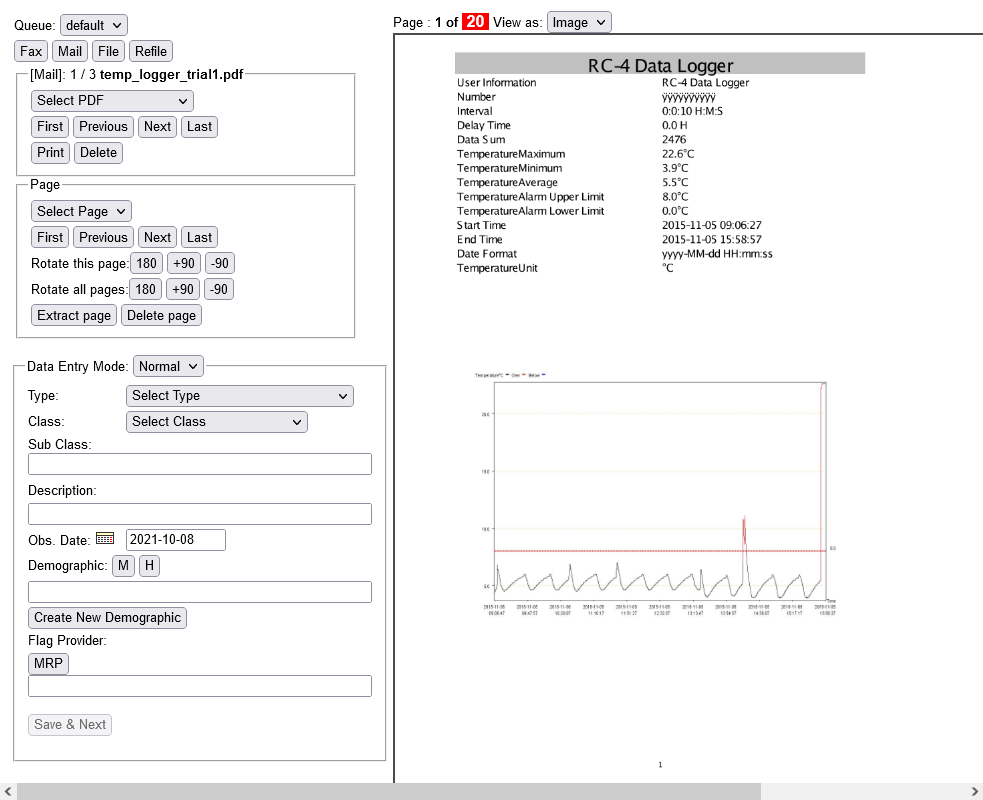
Incoming Docs has LOTS of maneuverability and ‘editing’ choices. The top section of the labeling window allows you to move between documents, and the 2nd section allows you to move within a single document. When someone sends a single fax containing multiple patient reports, these can all be separated right there in the 2nd section using the Extract function. Blank pages may be deleted, anything upside-down may be turned.
Another handy feature is that the tiny everpresent ‘pending documents’ Asterisk in the Menu Bar transforms itself into an Alert when an imported lab arrives without a relevant physician’s name in the ‘ordering’ or ‘copied to’ sections.
Do you want to have your incoming faxes automatically get downloaded into Oscar and show up in this Incoming Docs screen? Or do you need a custom integration that puts PDFs into this folder? Contact us and we can make it happen.
Lab Upload
The ‘Lab Upload’ link opens the manual lab upload window described in the Administration>Labs/Inbox>HL7 Lab Upload documentation.
For most Oscar installs it is desired to automate the importing of labs.
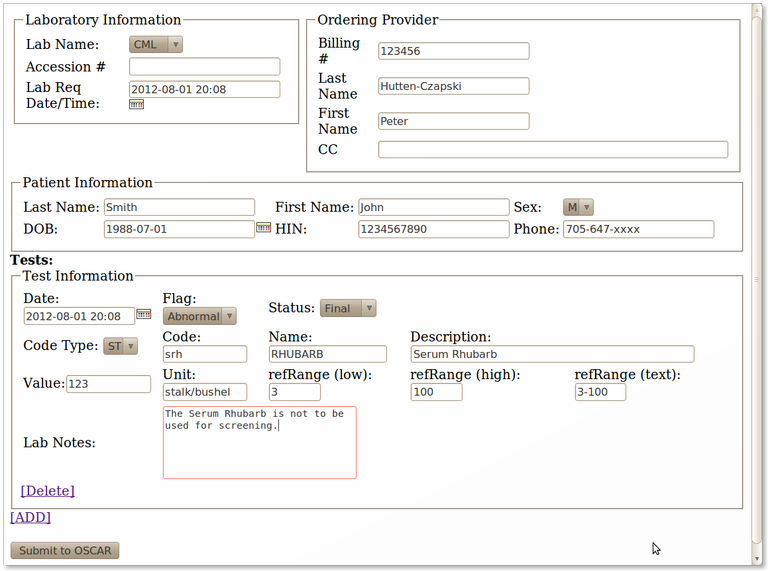
Create Lab
Create Lab allows for manual entry of laboratory data.
Tips: The CC format is xxx,xxx,xxx; yyy, yyy, yy
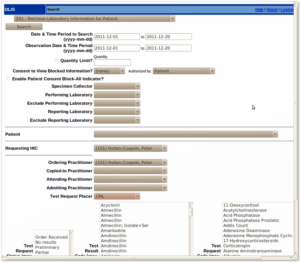
OLIS Search
This is an utility to search for patient data from the central Ontario laboratory server. This is usually configured to run automatically but this provision allows for a manual fetch of reports.
HRM Status/Upload
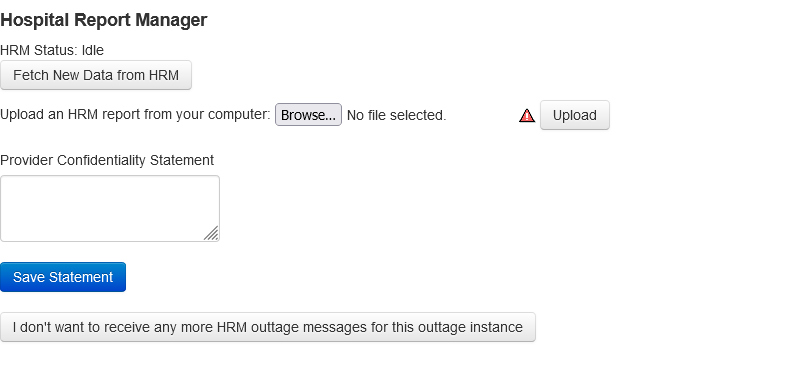
The Hospital Report Manager functions to electronically obtain patient reports from selected hospitals. This is usually configured to run automatically but this provision allows for a manual fetch of reports.
Video
Here is a video demonstration of OSCAR 19 Document Workflow Options:
Unclaimed Inbox
When you upload items to the unclaimed inbox, on most OSCAR systems an asterisk * will show next to Inbox which you will click on to access the unclaimed inbox, for example: Inbox*
However, on some OSCAR versions, a U to the right of Inbox will show up instead of the asterisk, which you would click on to see the unclaimed inbox.
On many OSCAR systems, the unclaimed inbox is where incoming faxes show up for filing.
Documentation copyright © 2012-2022 by Peter Hutten-Czapski MD and Adrian Starzynski under the Creative Commons Attribution-Share Alike 3.0 Unported License