Prescriptions/Prescribing
Copyright © 2012-2022 by Peter Hutten-Czapski MD and Adrian Starzynski under the Creative Commons Attribution-Share Alike 3.0 Unported License
DOCUMENT REVISION HISTORY:
Updated Jan 14, 2022 by Petter Hutten-Czapski
Updated Jan 20, 2022 by Adrian Starzynski
Updated Feb 22, 2023 by Adrian Starzynski
Accessing Rx
There are three ways to access the oscarRx prescriptions module:
- Appointment Bar
- Main Demographic Page
- Patient’s eChart
Appointment Bar

From the schedule screen choose the Rx button on the patient’s appointment bar.
Main Demographic Page
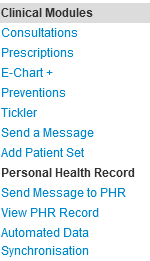
From the patient’s appointment bar or from patient search results screen, choose M, for the Main Demographic Record
Select Prescriptions under the Clinical Modules Heading
Patient’s eChart
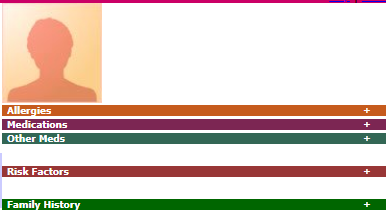
- From the patients appointment bar choose E for the Encounter Section
- Select Medications to open oscarRx
- Select the + on the Right of Medications to open oscarRx with long term drugs prescribed
STEP 1- SEARCH FOR DRUG
- In the box “Enter Drug Name…” type in the name of the drug you want to prescribe. After a few letters, the appropriate choices appear in a drop down list (TIP – you can narrow your search by picking the unique part of the drug name and the dose. For example “torva 20” will quickly find you Atorvastatin 20MG TAB).

- Click on the SEARCH button if you want selections of brand and trade names as well as drug classes to choose from.

TIPS:
- For information about the selected drug click on the link for the generic name and it will open a drug database.
- For prescription recommendations for certain diagnoses, click the ‘Drug of Choice’ link to the right of the box labelled Drug Name.
- The Note function lets you write free text on the prescription without quantity and repeats such as “Tennis Elbow Brace”
- For compounding drugs and mixtures such as 2% Hydrocortisone and 1/4% Menthol in Glaxal base use the custom drug function (detailed below)
I Can’t Find the Drug I’m Looking For
- If you can’t find the drug you are looking for, you can add one in freeform style. Just select the button that says “Custom Drug”

- The warning screen will appear
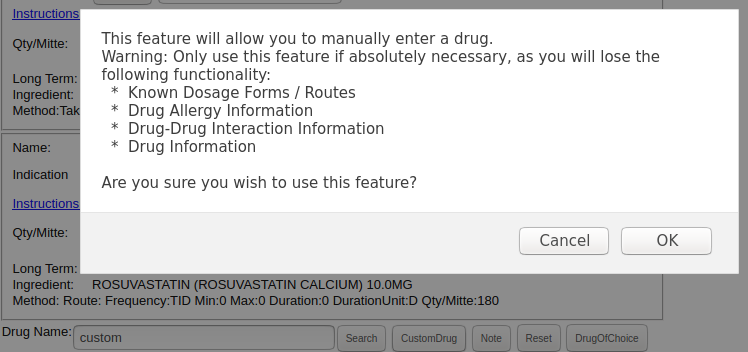
- Fill in the information needed.
STEP 2- WRITE THE Rx
- The writing area will expand to give you a space to fill in the instructions, quantity and repeats for the medication
- Did you forget your usual medication instructions?
- Click on the Ingredient: listed and a drug information database will open to that item
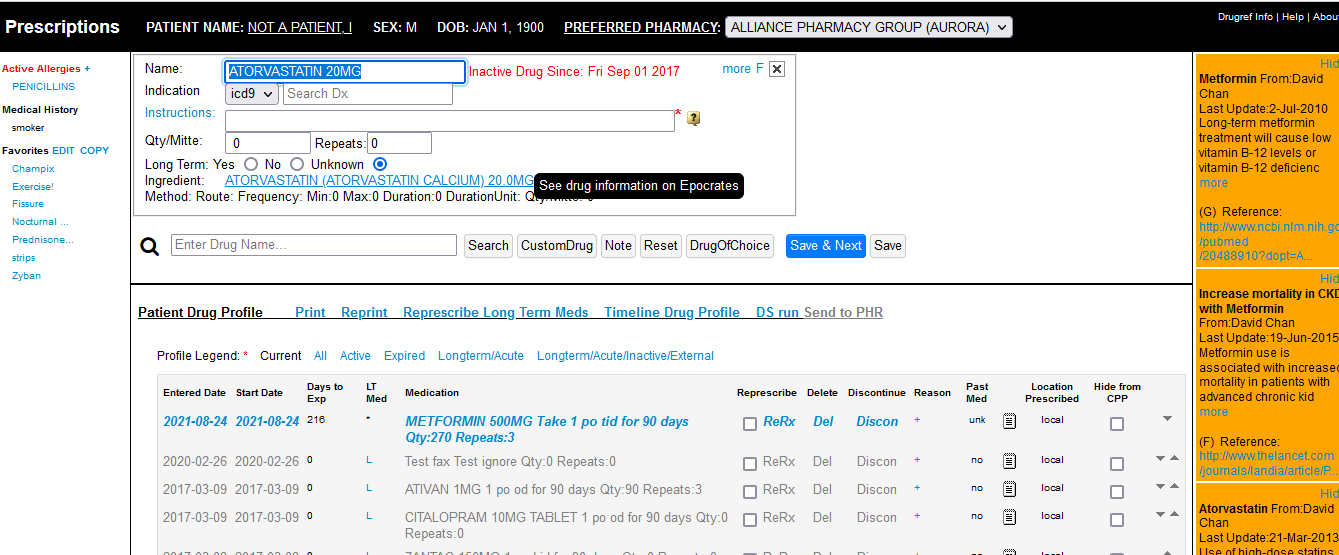
- OR click on the * and you will be given a pick list of your prior instructions to choose from.

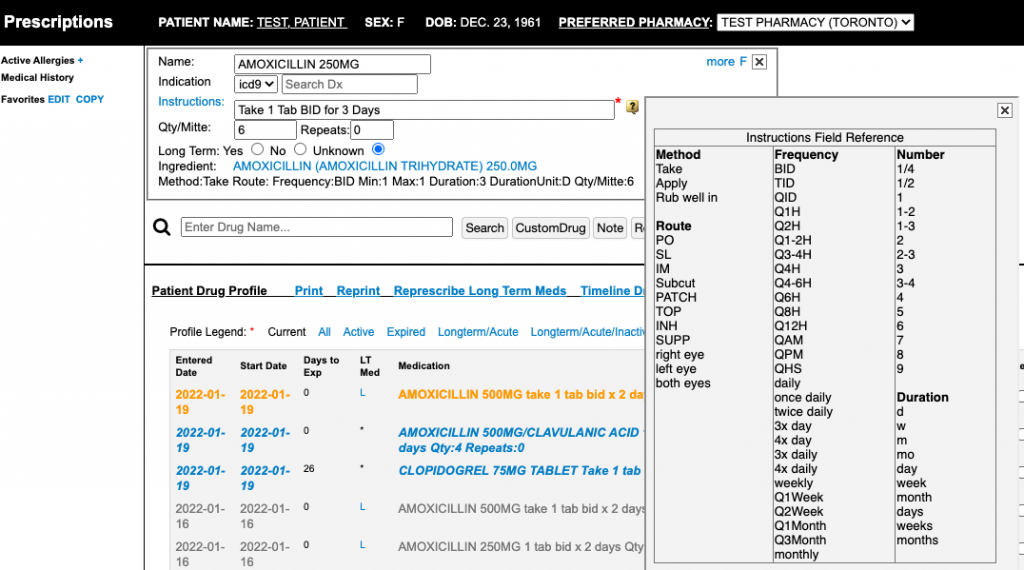
- You can also select
 . This will bring up the Instructions Field References Tab:
- Click on the Ingredient: listed and a drug information database will open to that item
- Check off the Long Term Med check box as appropriate. If Long Term Med is checked off, the drug in question will appear every time you create a prescription for the patient.
- A lot of natural language will be recognized when inserting prescription instructions. The Quantity and Duration will be filled out for you according to the list that shows up when you click
 .
.
- If the quantity and the duration fields are filled improperly, you can type them in manually. To activate the duration field, click on it as shown above and the focus will switch to where you can enter numbers. Click on the Unit label to change or enter the duration unit (e.g. days, grams, mL). You can change the character duration unit to either (D)ays (W)eeks or (M)onths.
- To add additional drugs to the same prescription, simply start typing the drug name into the “Drug Name:” field. If no additional drugs need to be added, proceed to printing or faxing the prescription. Click Save & Next to print/fax the Rx* (see STEP 3 below). Clicking just “Save” only saves the drug in the record, without printing/faxing it.
NOTE: the QTY field only accepts NUMBERS. If you enter any letters into the QTY field, the QTY will print as “0” on the Rx.
STEP 3- PRINT/FAX THE Rx
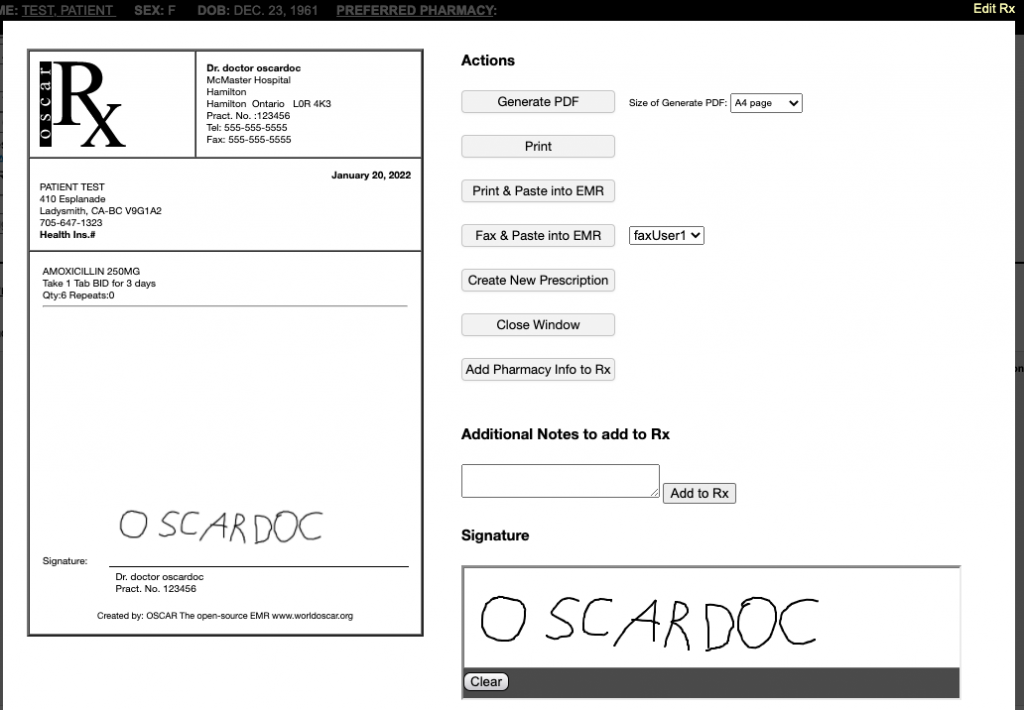
- The final screen brings up selections to print the patient’s prescription. This screen is accessed by clicking the Save & Next button.
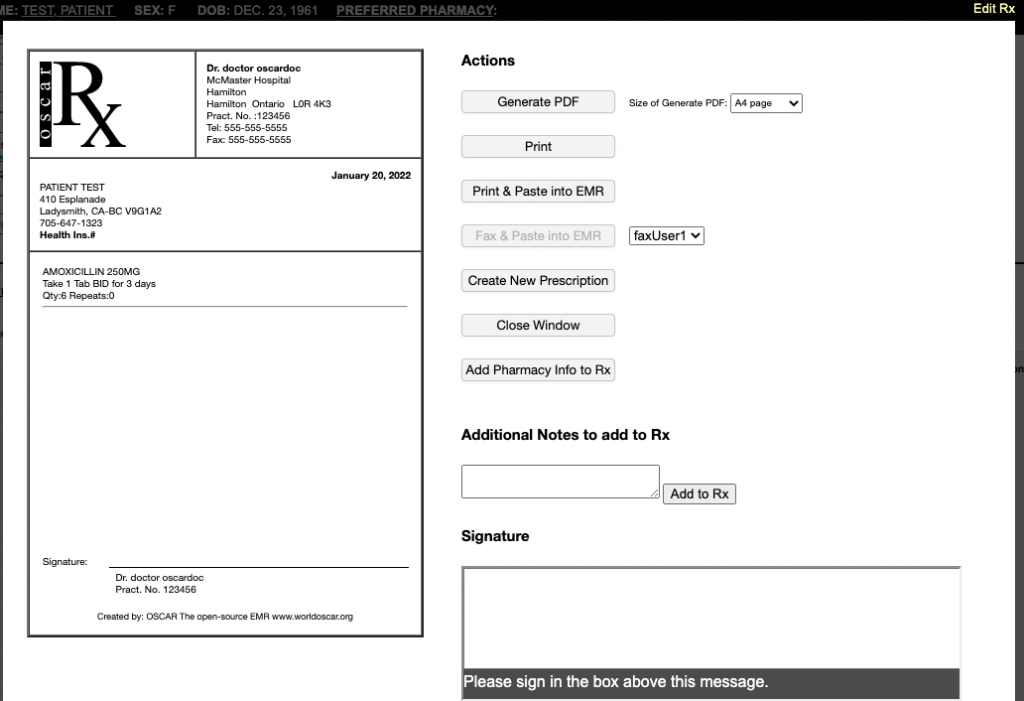
- If you forgot something or want to go back and edit the Rx, you can click on Edit Rx to return to the previous screen and edit/add drugs to the Rx
- Use Additional Notes to add comments, e.g. Deliver to home or Easy Open Vials. Click Add to Rx and this message will be added to the Rx above the signature.
- Use Add Pharmacy Info to add (alongside the Rx), the patient’s preferred pharmacy information (e.g. if you want the prescription to only be filled at a specific pharmacy – useful for controlled substances etc.) – in order for this to work, the patient has to have a preferred pharmacy set.
Mouse SIGNING Rx
Use your mouse or trackpad to sign in the signature box:
Click ![]() to enable the Fax option (if the patient has a Pharmacy set). The fax option is greyed-out by default until you sign the prescription and there is a pharmacy set.
to enable the Fax option (if the patient has a Pharmacy set). The fax option is greyed-out by default until you sign the prescription and there is a pharmacy set. 
Then, the prescription will have the signature on it like this:
Print/Fax/PDF Options
- Generate PDF will open a new tab with the prescription generated as a PDF (the PDF’s page size is regulated by the dropdown “Size of Generate PDF”)
- Print will simply print the Rx
- Print & Paste into EMR will: 1) print the Rx and 2) paste the drugs prescribed into an encounter note in the patient’s eChart, e.g.:

- Fax & Paste into EMR will: 1) fax the Rx to the preferred pharmacy IF SELECTED (in order for this button to be clickable, a preferred pharmacy must be set and you must have mouse-signed the Rx, otherwise this faxing button will be disabled) and 2) paste the drugs prescribed into an encounter note in the patient’s eChart WITH the pharmacy it was faxed to, e.g.:

RePrescribing
You may want to represcribe (ReRx) one or several previously-prescribed medications for a patient. Using the ReRx feature will save you time from manually re-entering each medication you want to represcribe.
To ReRx Just One Medication:
- Just click ReRx next to the medication you want to represcribe:

- Click Save & Next (see STEP 3- PRINT THE PRESCRIPTION)
To ReRx Multiple Medications:
- Check the boxes for the medications you want to represcribe under the Represcribe column
- Click the ReRx link next to any of the checkboxes you checked
- Click Save & Next (see STEP 3- PRINT THE PRESCRIPTION)

Patient Drug Profile
The Patient Drug Profile bar includes options for managing the patient’s drug history.

Patient Drug Profile Options:
- Print will open a new screen listing the patient’s detailed Rx history:
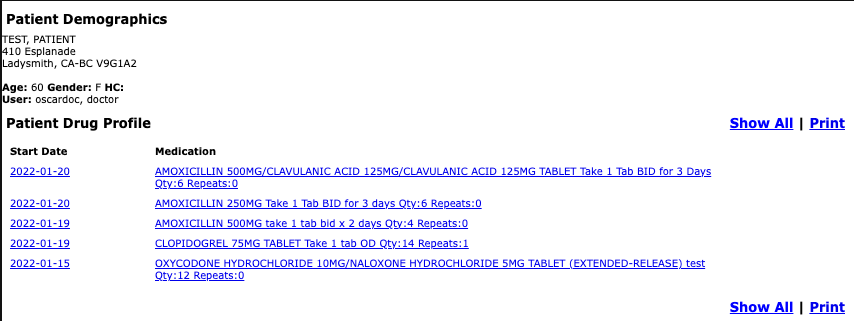
Clicking on the medications on this list will bring up the details for that prescription, including the Rx date and time, prescribing provider and all the other details. There are also options on this screen to add the drug to your Rx favorites, annotate it or Represcribe it.
- Reprint option shows a list of printed/faxed Rx’s and lets you choose one to reprint/refax. See Reprint/Refax below for details.
- Represcribe Long Term Meds will represcribe all medications marked as LT Med (useful time saving feature for routine Rx’s)
- Timeline Drug Profile opens up a detailed graph of the patient’s drug profile timeline which shows the time and other details for the patient’s Rx history
Reprint/Refax Rx
Note: Do not confuse Reprint with ReRx. Reprint is used for REPRINTING or REFAXING an entire prescription.
Example scenarios where you would use reprint:
- You need to reprint a copy of the prescription you just created for the patient because the printer messed up the first print.
- You need to re-fax a prescription because the fax failed the first time.
Reprint will preserve the Rx date and the information of the provider that generated the original prescription.
How to use Reprint:
1. Click Reprint from the Patient Drug Profile menu

2. Select the prescription you want to reprint/refax (note: if there were multiple medications on the prescription, Reprint would reprint all the medications that were originally on that Rx – you cannot just reprint an individual medication from a prescription)

3. The Rx preview screen will open – you can select the PDF/print/fax options as usual.
Allergies
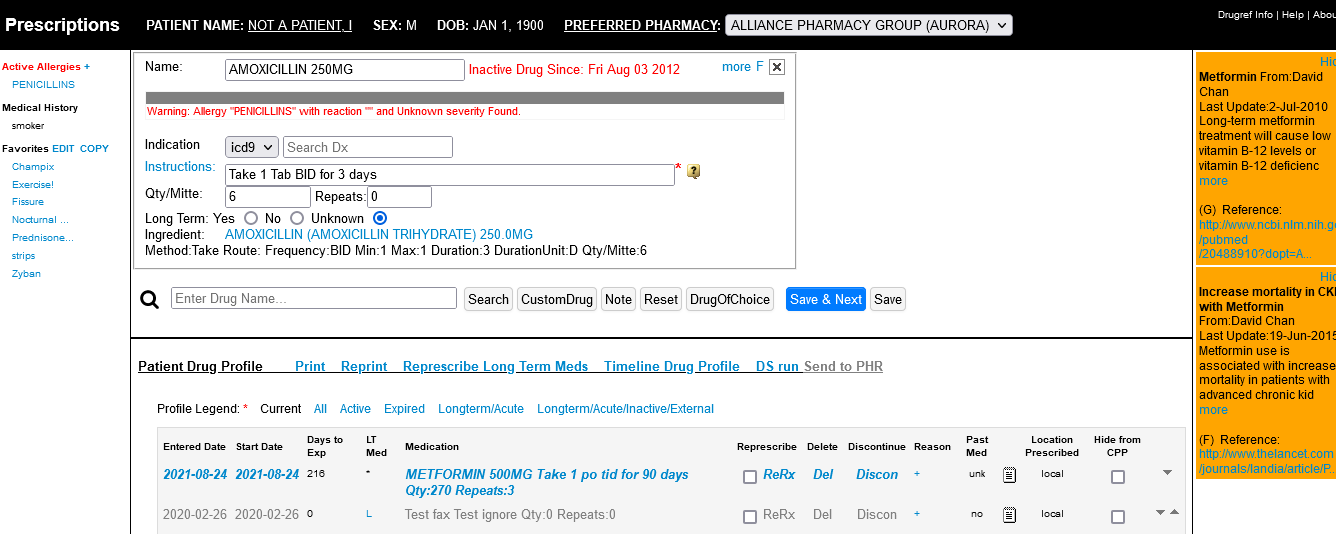
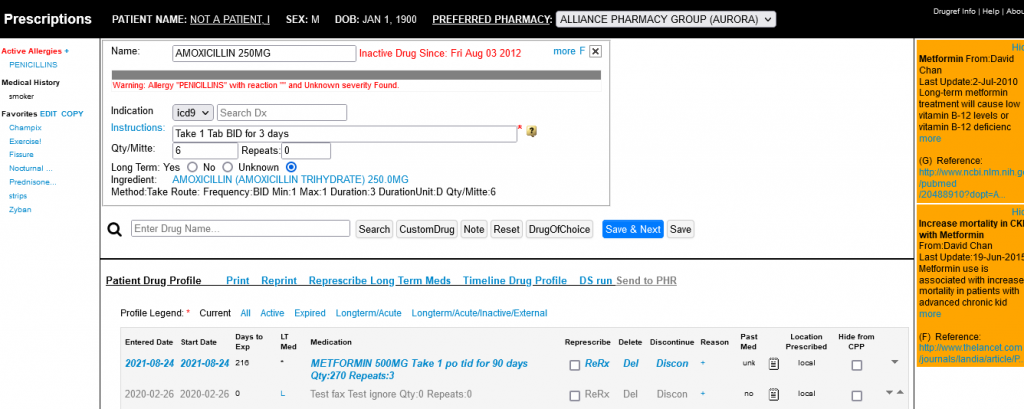
If you write an Rx for something that the patient has a listed allergy, you will be informed at the drug selection stage.
For more details on OscarRx Medication Allergies, click here for the article on managing allergies in more detail.
NOTE: For example if you wanted to prescribe Amoxil(R) for someone who is listed as being allergic to Penicillin then the flag will come up in Red. This is not a substitute for one’s professional obligation to independently review allergies, nor will the program prevent you from printing the prescription if that is what you feel is the clinically most appropriate course.
Profile
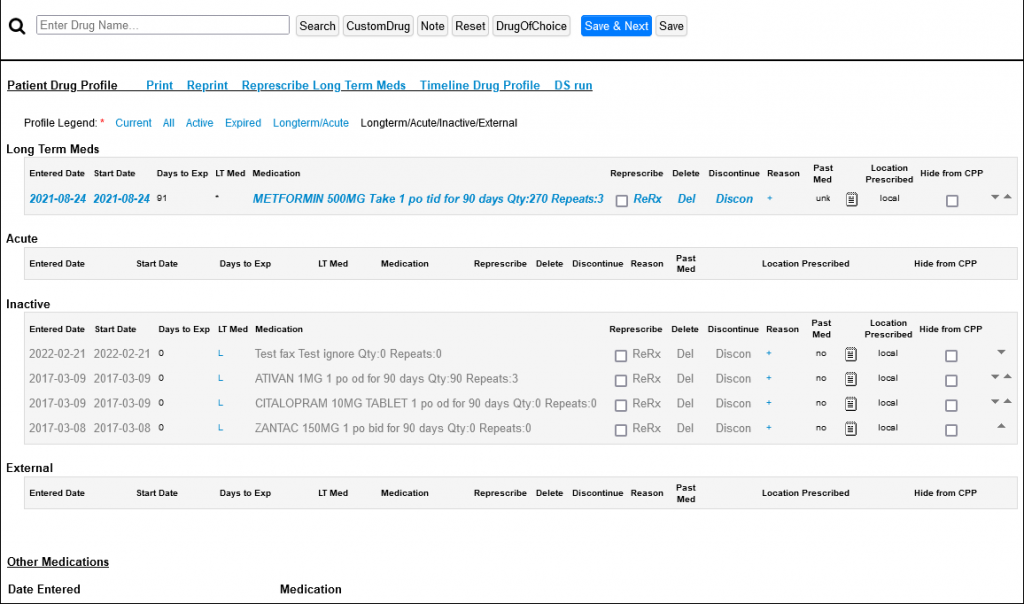
Click the red * to set a preference to set which profile you want as default, Current, All, Active, Expired, Longterm/Acute, Longterm/Acute/Inactive/External

Once set the type you chose becomes the default
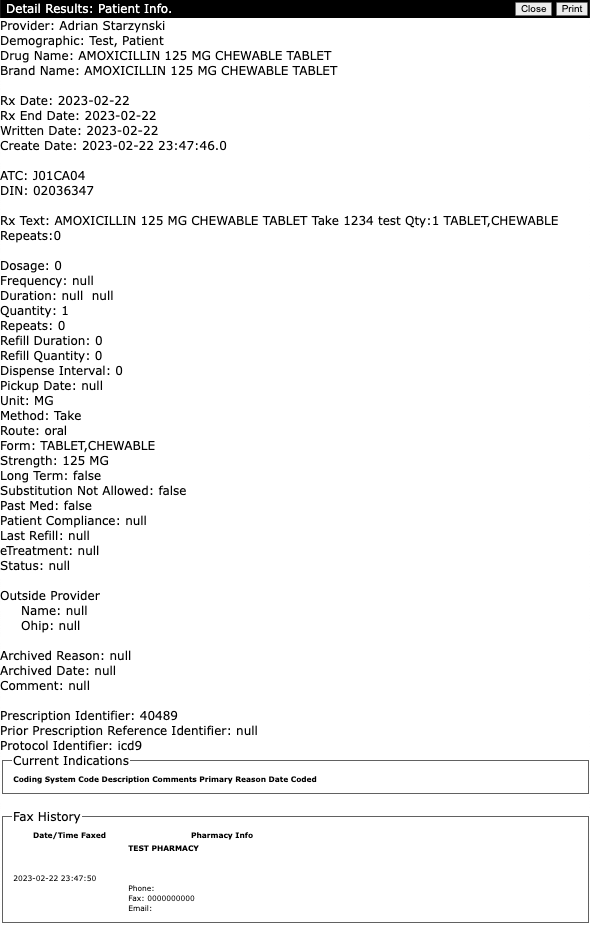
Viewing Fax History of an Rx
If your OSCAR system uses faxWS for outgoing faxes you can follow these steps to see whether a prescription was faxed, and exactly where/when it was sent:
1. In the main oscarRx screen click on the medication prescribed that you want to see fax history for.
i.e. in the below example I want to see when Amoxicillin was faxed and where:

2. Click on the medication’s name that isn’t crossed out:

3. You will get a new window which has the Fax History at the bottom. All the details about the written Rx will show along with the name/address/fax etc. of the pharmacy it was sent to and all the timestamps:
